Calculating and Loading Interim_Final Rates
CALCULATING AND LOADING INTERIM_FINAL RATES
BY

How to calculate and load Interim/Final rates on Everest
Everest is a unit-based system, and therefore requires that rates are converted to a unit price. To do this, a template is provided, for calculating the unit prices. Note that the template may change to accommodate the specific needs of the client, so please discuss your requirements with your EBSphere Consultant so that the correct template is provided.

INTERIM RATE
When loading rates for the first time on the Fund, start with a price of 100. If not, determine the unit price as at the last month prior to the new interim rate. E.g., if the interim is being applied for the year 2021, the unit price from Everest to be utilized will be as at 31/12/2020. To do this, ensure that the Parent is selected, go to Client → Investment Products:

Double Click on the “UPs” button for the product you want to update:

A screen will open that reflects the “Used Unit Prices”. These are the prices the system is currently using for calculation of member values and benefits.

If the last price is not reflected on the screen (in this example 31/12/2020) click on the “New Used Ups” button at the bottom of the screen:

If the last price is not reflected on the screen (in this example 31/12/2020) click on the “New Used Ups” button at the bottom of the screen – this screen reflects all prices that have been loaded for use:

Copy the price for the month prior to the new interim rate and use that as the starting price. In this example we are using a Nominal Rate calculation:

To calculate the interim rate prices for the next year, insert the MONTHLY interim rate to be used in column B, Return for the Month, for each month of the year. The spreadsheet will calculate the unit prices for each month:
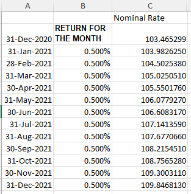
The new prices can be manually loaded in Everest, or the user may utilise the import file and function. Imports are preferred to prevent finger error.
To load the unit prices via the import functionality, first determine the ‘ProductID’ for the product being updated.
To do this, ensure that the Parent is selected, go to Client → Investment Products:
On the screen that opens, note the ProductID for the relevant product:

Once identified, prepare the Product Price Import file attached.

Populate the Date, ProductID and Unit Price columns:

To import the file, go to Accounts → Unit Price Management:

Locate the “Import your unit prices” section:

Click on the second Import button – Import Unit Prices for Parent Investment Products:
Browse to pick up your saved import file:

Select Save and Execute.
A report will be produced indicating that the headings were recognised.
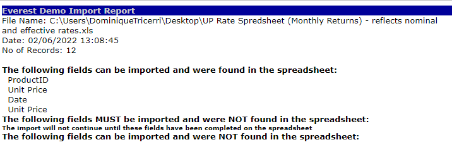
To confirm the rates were correctly imported, while on the Parent go to:
Client → Investment Products. Double click on “UPs” for the product imported. At the bottom of the screen click on the “New Used UPs” button. The screen that opens will reflect the new prices that are ready for use:

Once satisfied that the unit prices have been successfully imported, the prices are required to be linked for use in calculating the member values and benefits for the interim rate period.
Go to Accounts → Unit Price Management:
Locate the “Link your investments” section:

Click on the fifth “Select” button – Update used product prices from the ‘Start Date’ to the End Date’ section.
In the screen that opens, select the product you want to update, date range you want to link and select “Test” in the Custom 1 field. The Parent should be pre-populated but please do check it.

Save and Execute. A report will be produced confirming the prices it would write up:
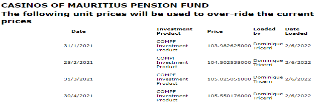
Once satisfied with the results, repeat using the “Live” option.
To check that the prices updated correctly, while on the Parent go to:
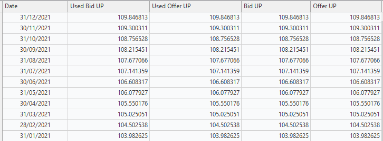
Client → Investment Products. Double click on “Ups” for the product. On the first screen that opens the new prices should appear.
FINAL RATE
Whilst waiting for the Final Rate to be declared, the interim rate unit prices were utilised to process claims. Once the Final Rate is received for the period, update the unit prices to use the Final Rate.
There are 2 ways of doing this. Applying the final rate retrospectively per month OR applying an annual rate at the end of the period.
The implication of each method is:
Monthly Retrospective Adjustment– All transactions processed in the interim period will have to be repriced. Any claims processed in the interim period will result in either positive or negative orphan units. If you are going to reprocess the claims and either pay additional or claw back overpayments, then this method will work for you.
Annual Adjustment – The transactions for the interim period would be unaffected and the active member values would be adjusted at the final once off date.
NB! With both methods, if you were processing claims for the period AFTER the Final rate was declared for, these claims would also create orphan units. It is best practice to hold payment of claims until the Final Rate is declared.
Final – Monthly Retrospective Adjustment
To calculate the monthly retrospective adjustment for the period, use the Unit Price calculator provided by your consultant. OVERRIDE the Interim prices used in the original calculation spreadsheet with the new final rate:
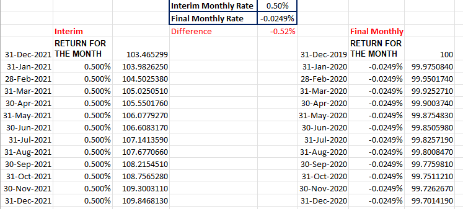
On Everest, manually adjust each month’s price. The import functionality cannot be used. While on the Parent go to Accounts → Investment Products:
Double Click on the “UPs” button for the product you want to update:
Click on the “New Used Ups” button at the bottom of the screen:
Edit each of the monthly unit prices to the new final prices:

In this scenario you will need to reprice the transactions for the period. While on the Parent, go to
Accounts → Unit Price Management:
Locate the “Link your investments” section:

Click on the third “Select” button – Reprice the cashflows for the selected Investment Policy’ section.
In the screen that opens leave the policy row blank, populate the date range you want to link, “Check” = No, and “Confirmed Prices Only” = No.
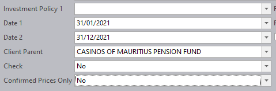
A report will be produced reflecting all the batches that have been repriced:

NB! If there are transactions that were processed AFTER the year end date, you will need to recalculate the unit prices for that period and reprice the transactions. The reason for this is that the unit price has changed at the year end, which then affects all unit prices thereafter. Follow the exact same procedure detailed above, but for the new year and utilising the new interim price for that year.
Final - Annual Adjustment
For an Annual Adjustment you will need to calculate the closing unit price via an Asset Liability match. To do so follow this procedure:
Liabilities:
While on the Parent, run the batch ‘Parent Investment Member Product’ at the year-end date:

Use the ‘By Client’ Report Output for the total values. If you want to see the data at member level, use the ‘By Member’ option.
A report will be produced:
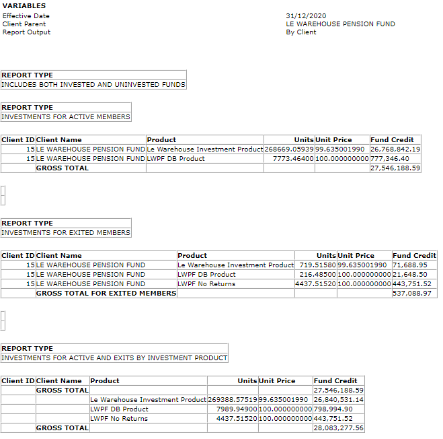
The report shows values for Active Members, Exited Members, and a combined total for both. If there are Exited Member values in the product you are calculating, you need to ascertain if the exits have been paid (call the Parent Investment Member Product report using the ‘By Member’ option). If they have been paid, they must be excluded from the Unit Price calculation.
Assets:
The total asset value is usually provided by the Actuary / Fund Accountant.
To calculate the closing unit price at year end, you divide the total asset value by the total UNITS in the product.
In this example we are using the total member assets excluding the exits as the exits have already been paid.

In this example we are calculating the unit price for both products, as both products are included in the total asset value.
Member Units = 268669.05939 + 7773.46400 = 276 442.52339
Total Assets = 49 832 892.00 (as received from Accounts)
Unit Price = 49 832 892.00 ÷ 276442.52339 = 180.264929537
Allocating on Everest:
We now need to adjust the Unit Price on Everest. While on the Parent, go to Accounts → Investment Products:
Double Click on the “UPs” button for the product you want to update (note that in this example we need to update the price for BOTH products):
Click on the “New Used Ups” button at the bottom of the screen:

Edit the year end unit price to the new final price:

Save and Close.
You now need to link the new Unit Price. While on the Parent, go to Accounts → Unit Price Management:

Locate the “Link your investments” section:

Click on the fifth “Select” button – ‘Update used product prices from the ‘Start Date’ to the ‘End Date’ section.
In the screen that opens, select the product you want to update, date range must be the year end, and select “Test” in the Custom 1 field. The Parent should be pre-populated but please do check it.
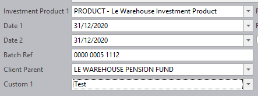
Save and Execute. A report will be produced confirming the prices it would write up:

Once satisfied with the results, repeat using the “Live” option. You will need to do this for each product that needs to be updated.
To check that the prices updated correctly, while on the Parent go to:
Client → Investment Products. Double click on “Ups” for the product. On the first screen that opens the new prices should appear.

To test the values, you can run the “Parent Investment Member Product” batch to see that the total member values now match the total asset value.
NB! If there are transactions that were processed AFTER the year end date, you will need to recalculate the unit prices for that period and reprice the transactions. The reason for this is that the unit price has changed at the year end, which then affects all unit prices thereafter.
Use the unit price calculator to calculate the new prices for the following year:
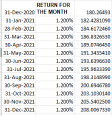
On Everest you will need to manually adjust each month’s price. The import functionality cannot be used in this case. While on the Parent go to Accounts → Investment Products:
Double Click on the “UPs” button for the product you want to update:
Click on the “New Used Ups” button at the bottom of the screen:
Edit each of the monthly unit prices to the new interim prices:
You will need to reprice the transactions for the period. While on the Parent, go to Accounts → Unit Price Management:
Locate the “Link your investments” section:
Click on the third “Select” button – Reprice the cashflows for the selected Investment Policy’ section.
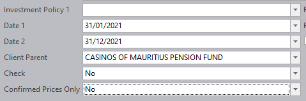
In the screen that opens leave the policy row blank, populate the date range you want to link, “Check” = No, and “Confirmed Prices Only” = No.
A report will be produced reflecting all the batches that have been repriced:
Disclaimer and Copyright
DISCLAIMER
Please note, whilst care is taken to illustrate numerous scenarios, it is impossible to detail all instances and therefore this document should merely serve as a guide for the purposes of demonstrating system functionality and conducting employee training.
In accordance with the above paragraph, this training manual is published and distributed on the basis that EBSphere (Pty) Ltd is not responsible/accountable for any actions taken by users of information contained in this training manual nor for any error in or omission from this manual.
EBSphere (Pty) Ltd does not accept any responsibility whatsoever for a misrepresentation performed by any person in respect of claims, losses or damage or any other matter, either direct or consequential arising out of or in relation to the use and reliance, whether wholly or partially, upon any information contained or products referred to in this manual.
Further, the contents of this training manual are subject to change without any notice and further highlight the need for this training manual to serve only as a guide.
COPYRIGHT
This documentation and the software described in it is the exclusive property of EBSphere (Pty) Ltd. This manual or the software may not be copied in whole or part, without the express written consent of EBSphere (Pty) Ltd. Under the law, copying includes translating into another language or format.
EBSphere (Pty) Limited
P.O. Box 785803
Sandton
2146