Section 14 transfer
SECTION 14 TRANSFER PROCESS
BY

Introduction
When processing a section 14 transfer out of Everest various factors need to be considered before commencing on the system.
- Is the section 14 transfer for an individual member?
- Is the section 14 transfer for a group of members or an entire client? (Bulk)
- What type of investment product is the member’s money held in? For example, is the member invested in a Managed Fund or a Unitised Fund?
Once these questions have been answered, the appropriate process can be followed. The user must ensure that the correct finalised Section 14 documentation has been received prior to commencing on Everest.
Section 14 Process for an Individual Member
Section 14 where the member is invested in a Managed Fund
Generate a Member Statement and ensure that all transactions have been completed and priced. Exit the member using the standard Member Exit Batch. Ensure that the workflow process is completed in full. The Disinvestment Process, which is part of the workflow MUST be done to ensure that the investable portion is moved to Bank for payment. Tax must be applied for on all Section 14 Transfers, in line with SARS’ rules. Payment is then made to the receiving Fund.
Section 14 where the member is invested in a Unitized Fund
Generate a Member Statement and ensure that all transactions have been completed and priced. Exit the member using the standard Member Exit Batch. Ensure that the workflow process is completed in full. The Disinvestment Process, which is part of the workflow MUST be done to ensure that the investable portion is moved to Bank for payment. Execute the transaction in Market and ensure that the transaction is priced before continuing. Tax must be applied for on all Section 14 Transfers, in line with SARS’ rules. Payment is then made to the receiving Fund.
Bulk Section 14 Process
Bulk Section 14 where the member is invested in a Managed Fund
- Generate a few Member Statements and ensure that all transactions have been completed and priced. Check that there are no Outstanding Contributions.
- that the banking details of the receiving Fund has been loaded in the Administration > Financial Settings > System Bank Accounts > Transfer Funds (Bank Account Type) screen. Should the user not have access to this screen ensure that someone who does have access loads the banking details before commencing the process.
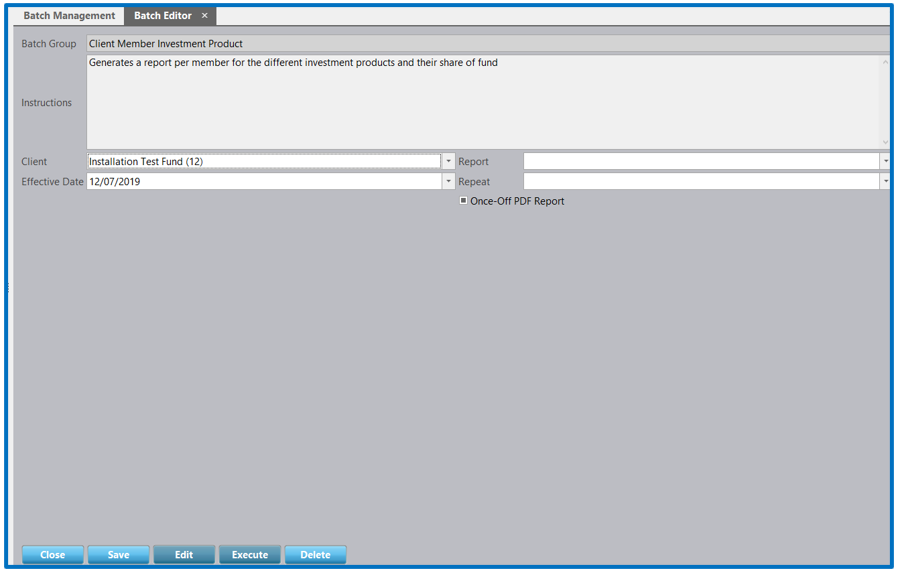
Select and generate the “Client Member Investment Product” batch.
Effective Date: Today’s date.
Click on “Save” and “Execute”.
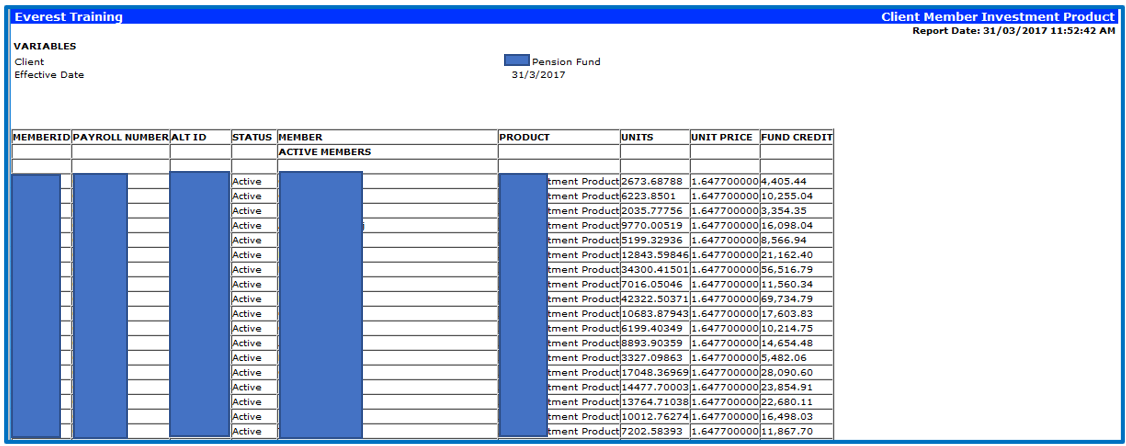
A report will generate reflecting the member’s current Fund Credit.
Using the Import Unclaimed Benefit Template, create a file for import. This template will process the member’s exits in Bulk and write up the payment to be paid into the transferring Fund.

Critical fields that must be considered are:
System Number This is the unique Everest generated number.
Exit Type The Exit type is depicted as a number that must be copied from the Key to ensure that the correct exit type is used.
ID Number Member’s Identity number.
Tax Ref No Member’s tax reference number.
DOX Date of exit, this is the Section 14 date.
Gross Benefit This is the Rand Amount of the member’s benefit to be transferred, if its not 100% of the members benefit. Leave blank if the full benefit is to be transferred
Tax Upload Group Set a tax group name, for example 22042020 (date of tax application)
Effective Date This is the Section 14 Date.
Transfer Always set this to Y
Transfer Fund Type This is the transfer fund type of the receiving Fund. This needs to match the System Bank Accounts screen exactly.
Transfer Fund Name This is the name of the receiving Fund. This needs to match the System Bank Accounts screen exactly.
FSB Transfer Fund No This is the FSB number of the receiving fund and must match the System bank account screen exactly.
Transfer Participating Employer This is only required if the last 6 digits of the FSB Transfer number does not end in zeros (0)
Once the file has been updated, save the file for import into the system.
Select and generate the “Import Unclaimed Benefits” batch.
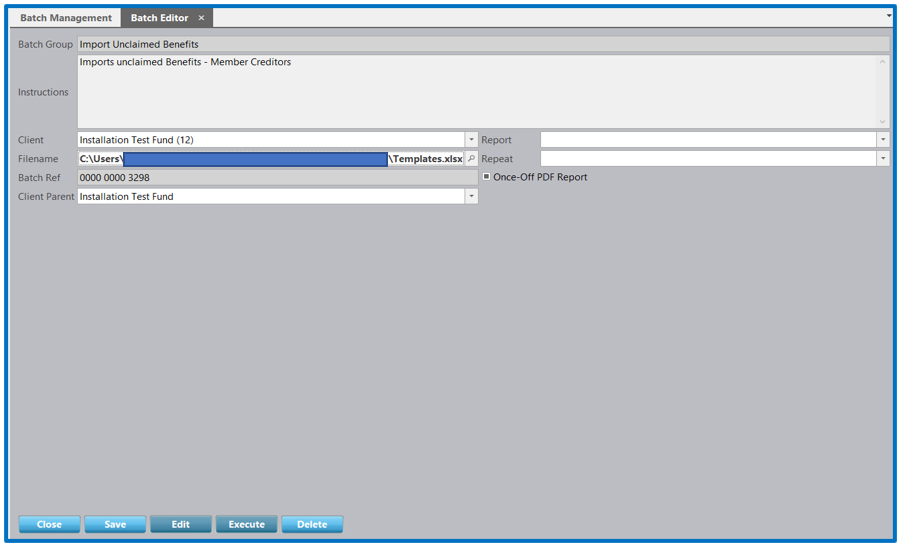
Client This is the Client for which the Section 14 is being processed.
File Name Click on the “Browse” button and locate the saved file.
Batch Reference This is defaulted by the system.
Client Parent This is the Parent that the client belongs to.
Click on the “Save” and “Execute” button.
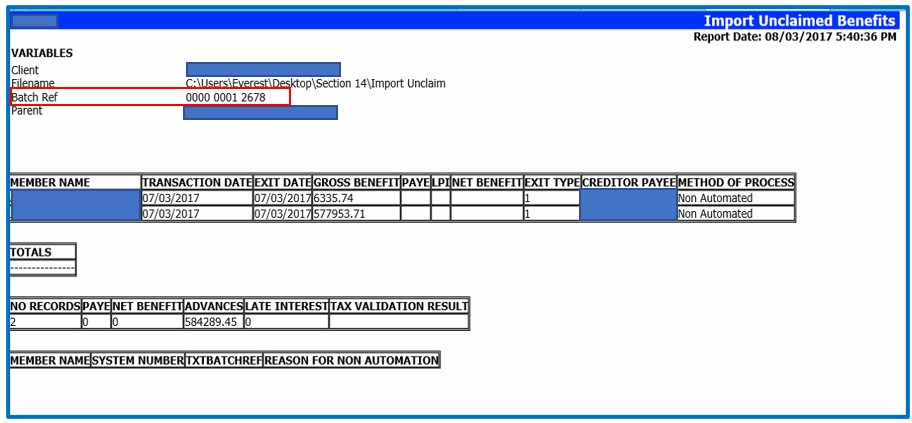
Two reports will generate. The first being confirmation of the fields that were required and what was supplied to generate the report.
The second report will confirm if the import was successful or not. If the import was not successful, the errors will need to be rectified before the import is run again. The batch ref number of the successful import, as highlighted below, must be kept as it will be used later in the process.
The tax information will be populated with the transfer details contained in the file and under System Bank Accounts. The tax application will need to be submitted to SARS and a response is required before processing with payment.
The member records now appear in RED with an exit date and an exit type.

Once the tax response is received, the “Import Unclaimed Benefits – Creditor Payment” batch needs to be run.
Insert the Batch Number from your first import, that was done previously, into this Batch Ref field.
The Administrator Bank field is the name of the creditor being paid that has been set up under System Bank Accounts (Transfer Funds).
A report will generate confirming which benefits have been populated for payment. Only benefits where tax has been received back will be populated. The report will clearly highlight which members are ready for payment and which are not.
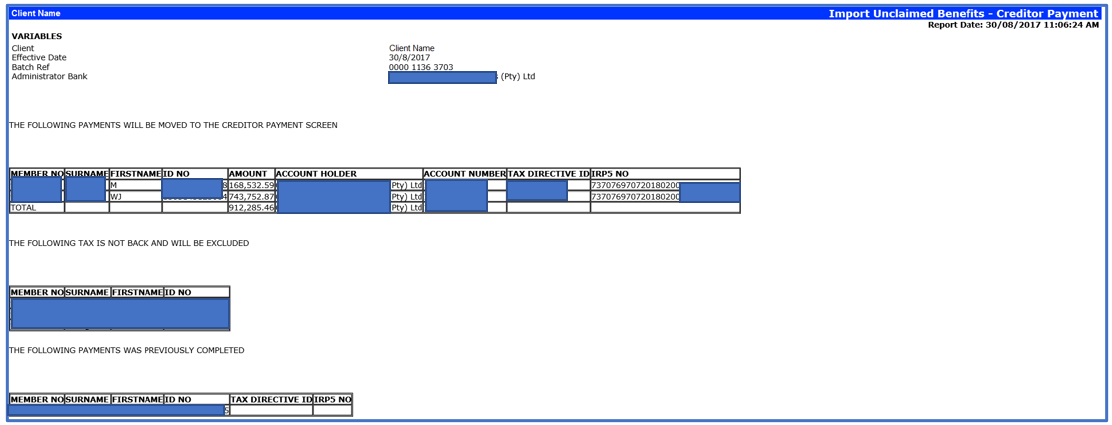
Click on the cflo button on the member record. A line would have been created for payment.
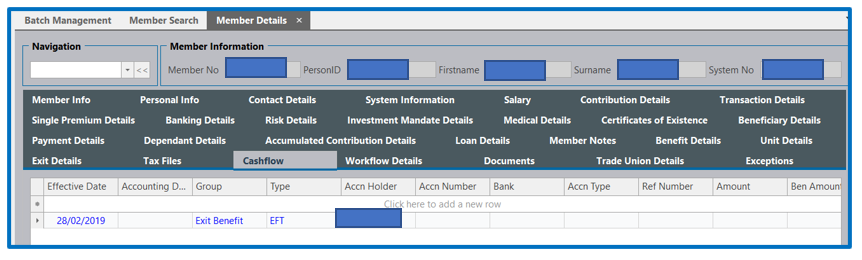
The payment can now be made in Bulk at the Parent Level.
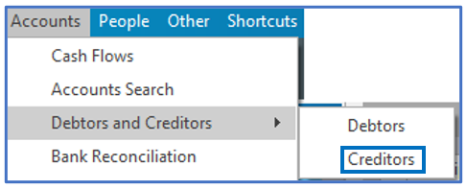
Go to Accounts > Debtors and Creditors Menu item.
Select “Creditors”. A creditor payment reflects in the Creditor Payment.

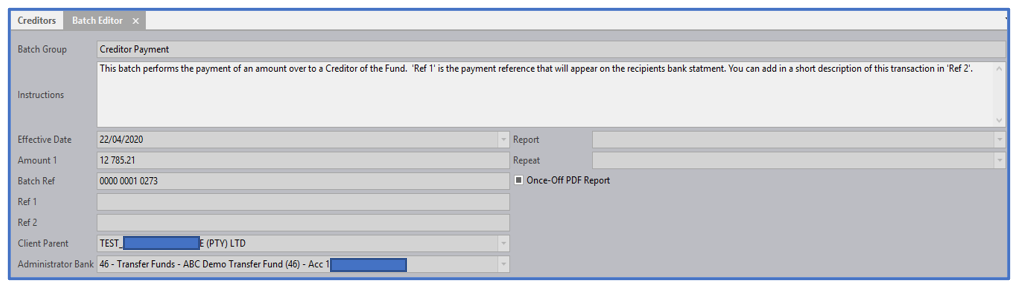
Select eft hyperlink and a batch editor screen will open to generate the Payment.
The payment can be approved on the Payment Management screen as a bulk payment. The process has been completed and the necessary payment records have been created.
Bulk Section 14 where the member is invested in a Unitised Fund
- Generate a few Member Statements and ensure that all transactions have been completed and priced. Also ensure there are no Outstanding Contributions.
- Ensure that the banking details of the receiving Fund has been loaded in the Administration > Financial Settings > System Bank Accounts > Transfer Funds (Bank Account Type) screen. Should the user not have access to this screen ensure that some who does have access loads the banking details.
Ensure that the client has been selected.
Go to the Accounts > Investment Switch Menu option and create the switch, moving 100% of the member’s Fund Credit into the bank account.

The system has the option to import the member switch as well. Should only a select number of members be transferring out, the preferred option would be to complete the “Investment Switches Import” template and import the members for switching.

Please refer to the Investment Switches guide for the full process to be followed.
Once the switch has been generated (as per the Investment Switches guide), go to Accounts > Cashflow Unit Prices screen at a Parent level to obtain the number of units that must be disinvested from the market.

Only once the disinvestment process has been finalised in full can the user continue with the process.
Select and generate the “Client Member Investment Product” batch, once the disinvestment has been actioned and priced.
Effective Date: Today’s date.
Click on “Save” and “Execute”.
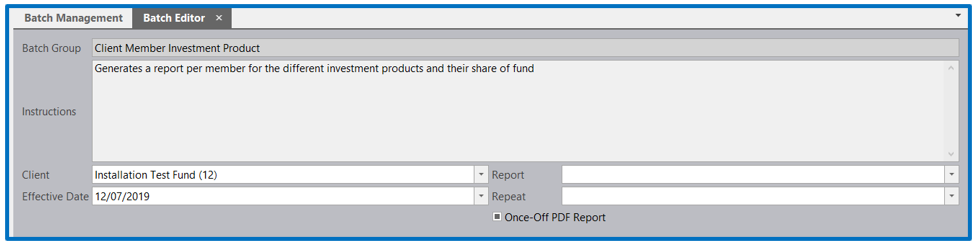
A report will generate reflecting the member’s current Fund Credit.
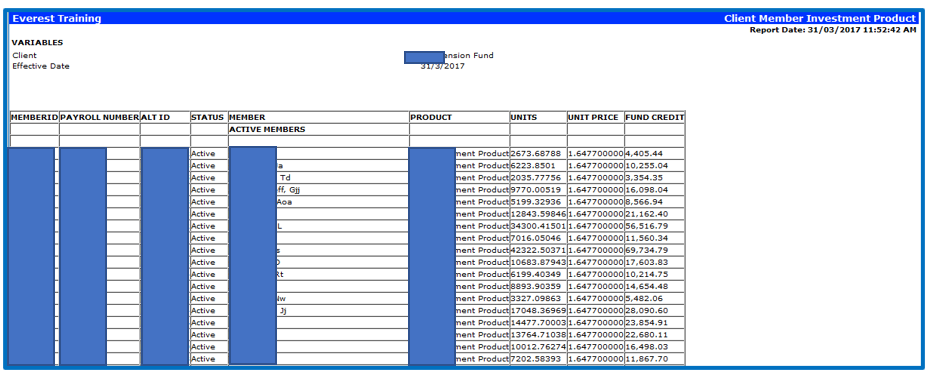
Using the Import Unclaimed Benefit Template, create a file for import.
This template will process the member’s exits in Bulk and write up the payment to be paid into the transferring Fund.
Critical fields that must be considered are:
System Number This is the unique Everest generated number.
Exit Type The Exit type is depicted as a number that must be copied from the Key to ensure that the correct exit type is used.
ID Number Members Identity number.
Tax Ref No Members tax reference number.
DOX Date of exit, this is the Section 14 date.
Gross Benefit This is the Rand Amount of the member’s benefit to be transferred, if its not 100% of the members benefit. Leave blank if the full benefit is to be transferred
Tax Upload Group Set a tax group name, for example 22042020 (date of tax application)
Effective Date This is the Section 14 Date.
Transfer Always set this to Y
Transfer Fund Type This is the transfer fund type of the receiving Fund. This needs to match the System Bank Accounts screen exactly.
Transfer Fund Name This is the name of the receiving Fund. This needs to match the System Bank Accounts screen exactly.
FSB Transfer Fund No This is the FSB number of the receiving fund and must match the System bank account screen exactly.
Transfer Participating Employer This is only required if the last 6 digits of the FSB Transfer number does not end in zeros (0)
Once the file has been updated, save the file for import into the system.
Select and generate the “Import Unclaimed Benefits” batch.
Client This is the Client for which the Section 14 is being processed.
File Name Click on the “Browse” button and locate the saved file.
Batch Reference This is defaulted by the system.
Client Parent This is the Parent that the client belongs to.
Click on the “Save” and “Execute” button.
Two reports will generate. The first being confirmation of the fields that were required and what was supplied to generate the report.
The second report will confirm if the import was successful or not. If the import was not successful, the errors will need to be rectified before the import is run again. The Batch Ref number of the successful import, as highlighted below, must be kept as it will be used later in the process.
The tax information will be populated along with the transfer details contained in the file and under System Bank Accounts. The tax application will need to be submitted to SARS and a response is required before processing with payment.
The member records now appear in RED with an exit date and an exit type.
Once the tax response is received, the “Import Unclaimed Benefits – Creditor Payment” batch needs to be run.
Insert the Batch Number from your import, that was done previously, into this Batch Ref field.
The Administrator Bank field is the name of the creditor being paid that has been set up under System Bank Accounts (Transfer Funds).
A report will generate confirming which benefits have been populated for payment. Only benefits where tax has been received back will be populated. The report will clearly highlight which members are ready for payment and which are not.
Click on the cflo button on the member record. A line would have been created for payment.
The payment can now be made in Bulk at the Parent Level.
Go to Accounts > Debtors and Creditors Menu item. Select “Creditors”.
A creditor payment reflects in the Creditor Payment.
Select eft hyperlink and a batch editor screen will open to generate the Payment.
The payment can be approved on the Payment Management screen as a bulk payment. The process has been completed and the necessary payment records have been created.
Disclaimer and Copyright
DISCLAIMER
Please note, whilst care is taken to illustrate numerous scenarios, it is impossible to detail all instances and therefore this document should merely serve as a guide for the purposes of demonstrating system functionality and conducting employee training.
In accordance with the above paragraph, this training manual is published and distributed on the basis that EBSphere (Pty) Ltd is not responsible/accountable for any actions taken by users of information contained in this training manual nor for any error in or omission from this manual.
EBSphere (Pty) Ltd does not accept any responsibility whatsoever for a misrepresentation performed by any person in respect of claims, losses or damage or any other matter, either direct or consequential arising out of or in relation to the use and reliance, whether wholly or partially, upon any information contained or products referred to in this manual.
Further, the contents of this training manual are subject to change without any notice and further highlight the need for this training manual to serve only as a guide.
COPYRIGHT
This documentation and the software described in it is the exclusive property of EBSphere (Pty) Ltd. This manual or the software may not be copied in whole or part, without the express written consent of EBSphere (Pty) Ltd. Under the law, copying includes translating into another language or format.
EBSphere (Pty) Limited
P.O. Box 785803
Sandton
2146